To understand the beauty and strength of a wooden hanger, you must know the path a single log takes to become thousands of wooden hangers. There is a simple and time-worn process that we follow, from choosing the right type of wood to sanding and pairing with the perfect hook.
But, First … A Brief History of Hangers
The world was a much different place when Hanger Store was founded back in 1915. Less than half of American homes had electric power. Henry Ford’s revolutionary automobile assembly line had only been around for a year or two. This was a time of transition for almost every industry, converting from goods that were made with simple hand tools and basic machines to items produced in much larger quantities and with much more efficient machines.
By this time, the clothes hanger had been around for a while. Some historians believe Thomas Jefferson invented the wooden coat hanger. Our prolific former president and founding father is also credited with inventing the hideaway bed and the dumbwaiter, among other things.
But the consensus today is that a man named O.A. North fashioned a space-saving clothing hook in the 1860s that was the precursor of the modern hanger. From there, it wasn’t until 1903 that this basic wire hook was taken a step further. In that year, a man named Albert Parkhouse created the device that we now know as the hanger, bending some wires to create a hanging device in response to co-workers’ complaints about a shortage of coat hooks at the factory where they worked.
Types of Wood
Hearkening back to the industrial revolution, a period when goods were made from a combination of good, old-fashioned elbow grease and the ease of machinery, today’s wooden hangers are made with a blend of man and machine power. They are produced by the thousands, but still retain elements of hand craftsmanship.
Of course, like any wooden item, hangers begin with trees. Hangers these days can be made of a wide range of woods, such as:
Hanger Store hangers are never made from old-growth wood or from threatened species of wood. We use woods like the above because they are plentiful, they have short fibers that give it strength, and they do not produce excessive sap. That makes these woods easier to work with.
To the Sawmill
Logs are shipped to sawmills, where they begin the process of cutting and shaping raw wood into what will become hangers. A single log, if it’s big enough, can easily produce 2,000 hangers!
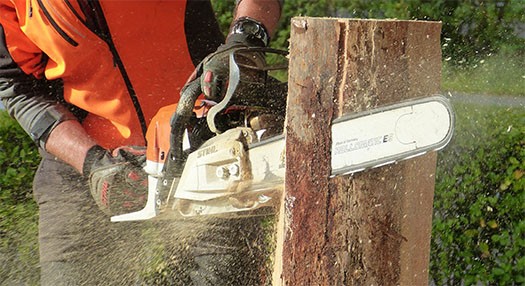
Logs are cut lengthwise first, producing long strips of timber, then cross cut to bring them down to a manageable size. For a good hanger, all the bark must be shaved off, too!
What’s left is square panels of raw wood. The carpenter then puts each panel through a special machine that slices off a thick, curved piece of wood every time the block passes over the blade. (It’s sort of like slicing off pieces of ham at Christmas dinner.) But this yields only a rough piece of curved wood, and it’s much bigger than a single hanger.

Taking Shape
To start smoothing things out, the curved pieces are passed through another machine that gives the wood some of the features that make it recognizable as a coat hanger. That includes rounding the edges and carving the indentations that are used for hanging things like spaghetti-strap dresses.
Then, to cut the large piece down to size, it goes through a machine that slices the single, curved piece of wood, which right now looks like a hanger for a giant’s closet, into four or 5 thinner pieces that look much more like the hangers used by us everyday people.

Drying and Sanding
Once the hangers are cut to the right size, they are stacked up, usually in a crisscross pattern because this allows for a lot of airflow. Why is air needed? Because the next step in the process is to move the stacks of wood into a drying area, where they will cure for about two weeks, depending on the type of wood.
Hanger Store wood goes through a kiln drying process, what you might think of as a slow cooking process that dries the wood out the way we think works best. This provides a stable, warp-free, and furniture-grade final product.
The familiar shape of a hanger is now obvious, but at this stage the material is still quite rough. So, after drying is over, a worker puts each piece of wood through a sander that smooths things out, and then hand sands as needed to make it just perfect.

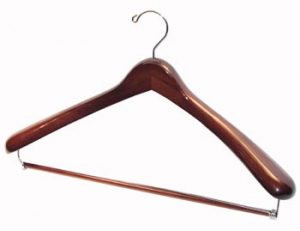
Drilling, Varnishing and Hooking
So far, we have nice, smooth pieces of wood, but if they are going to become hangers then they are going to need a hook. Workers use drills to put a hole in right place of each wood piece where a hook will be inserted. A skilled worker in the right conditions can drill a few hundred of these an hour!
But before the hooks are inserted into the newly-drilled pieces, they first must take a bath – a varnish bath. The pieces are arranged on a rack and either dipped into a varnish bath (for large quantities) or hand varnished (for smaller, custom orders). Hangers are going to be touched often and used a lot, and the varnish gives the wood a robust finish that will stand up to frequent use. Then the hangers are left to dry for at least 12 hours.

Once dry, the support bar that holds up your pants is nailed into place. And finally, the hangers get their hooks. Just like the rest of the hanger making process, it’s a combination of human touch and machine force that allows the hook to be inserted properly.
And Voilà! You Have a Hanger!
From a single log, thousands of beautiful new hangers are made. If you would like to have some of them hanging in your closet, contact our team here at Hanger Store. We would love to give you more details on the process of how wooden hangers are made, and then help you find the right hanger for your needs.
*Images used in this post are from this video on how to make hangers: https://www.youtube.com/watch?v=mKltSj3CrAQ


